Big Green Clean Machine Manual: A Comprehensive Guide
This manual details operation, maintenance, and troubleshooting for the Bissell Big Green Clean Machine, ensuring optimal performance and longevity of your carpet cleaner.
The Bissell Big Green Clean Machine is a powerful and versatile carpet cleaning solution designed for both home and commercial use. This manual serves as a comprehensive guide to help you understand and effectively utilize all the features of your machine. It covers everything from initial setup and operation to detailed maintenance procedures and troubleshooting tips.
Before operating, carefully review the safety precautions outlined within this manual to ensure safe and efficient cleaning. Understanding your machine’s components and their functions will maximize its cleaning potential. Vacuums R Us & Sewing Too emphasizes that appliance repairs carry inherent risks, and this guide aims to minimize those risks through clear instructions. Proper care and adherence to these guidelines will keep your Big Green Clean Machine performing optimally for years to come.
Understanding Model Numbers and Serial Numbers
Locating your Big Green Clean Machine’s model and serial number is crucial for accurate parts ordering, warranty claims, and accessing specific support resources. The model number identifies the specific version of the machine, while the serial number provides unique manufacturing information.
Typically, these numbers are found on a sticker or plate affixed to the machine’s housing – often on the base or near the water tanks. When contacting customer support or ordering replacement parts (like the Clean Tank Assembly, Part 2037454), always have both numbers readily available. Vacuums R Us & Sewing Too requests this information when ordering service parts to ensure compatibility. Providing these details streamlines the process and guarantees you receive the correct components for your specific Big Green Clean Machine.
Safety Precautions and Warnings
Prioritize safety when operating your Big Green Clean Machine. Always disconnect the machine from the power source before performing any maintenance or troubleshooting. Never operate the machine with a damaged cord or plug. Avoid using it on electrical outlets near water.
Do not allow children to operate the machine unsupervised. Use only cleaning solutions specifically designed for carpet cleaners to prevent damage or hazardous reactions. Ensure adequate ventilation during operation. Vacuums R Us & Sewing Too emphasizes that all appliance repairs carry inherent risks, so proceed with caution. Be mindful of the potential for slips and falls on wet surfaces during and after cleaning. Always follow the instructions outlined in this manual.
Assembly and Initial Setup
Proper setup is crucial for effective cleaning. This section guides you through unboxing, attaching components, and correctly filling both the clean and dirty water tanks.
Unboxing and Component Checklist
Carefully unpack your Big Green Clean Machine and verify all components are present. The box should contain the main unit, the handle assembly, a clean water tank, a dirty water tank, a floor nozzle, various attachments (depending on the model), and this instruction manual.
Inspect each part for any shipping damage. If damage is found, contact Bissell customer support immediately. A complete checklist is vital: confirm the presence of the spray trigger, hoses, and any specialized nozzles. Refer to the parts diagram (often found online or within supplemental documentation) to ensure nothing is missing.
Retain the packaging for potential returns or warranty claims. Before proceeding, familiarize yourself with each component’s purpose to streamline the assembly process. Missing parts can hinder initial setup and delay your cleaning efforts.
Attaching the Handle and Accessories
Begin by securely attaching the handle to the main unit. Typically, this involves aligning the handle base with the designated slots on the machine and firmly clicking it into place. Ensure a snug fit to prevent wobbling during operation.
Next, connect any desired accessories, such as specialized nozzles for upholstery or stairs. These usually snap or screw onto the end of the hose. Verify a secure connection before use to avoid detachment during cleaning.
Double-check all attachments for proper alignment and stability. A loose handle or accessory can compromise cleaning performance and potentially cause damage. Refer to the included diagrams for visual guidance if needed. Proper assembly is crucial for safe and effective operation.
Filling the Clean and Dirty Water Tanks
Before operation, fill the clean water tank with hot tap water, reaching the bottom of the vertical indicators – approximately two gallons. Add the recommended amount of Bissell cleaning solution, ensuring it’s compatible with your machine and flooring. Avoid overfilling to prevent spills.
The dirty water tank is initially empty. This tank collects the extracted dirty water during cleaning. Ensure it’s properly seated before starting. Regularly check the dirty water tank’s fill level during use to prevent overflow, especially during heavily soiled areas.
Always use clean, hot tap water in the clean tank and empty the dirty water tank promptly after each use.
Operating Instructions
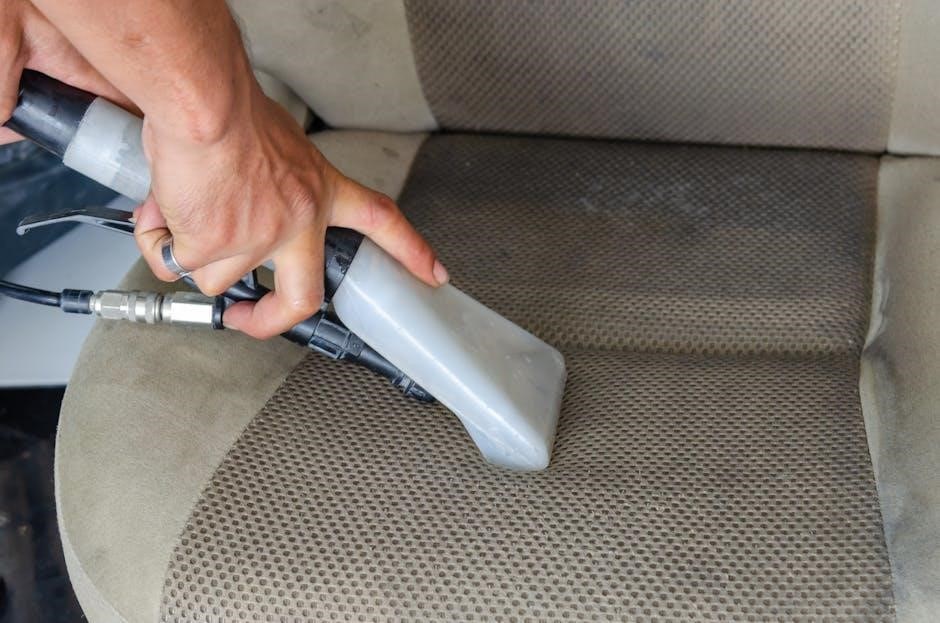
To begin cleaning, power on the machine, depress the trigger, and pull the floor nozzle towards you for effective extraction and cleaning action.
Powering On and Basic Operation
Before initial use, ensure both the clean and dirty water tanks are properly installed and secured. Connect the power cord to a grounded electrical outlet. To power on the Big Green Clean Machine, locate the power switch – typically labeled “On/Off” – and switch it to the “On” position. You should hear the vacuum motor and pump activate.
The machine features two primary switches: one for vacuum/suction and another for the pump/spray function. Ensure both are turned on for optimal cleaning. Begin by testing the trigger mechanism; depressing it initiates the spray function, releasing cleaning solution onto the surface. Release the trigger to stop spraying while continuing suction. Familiarize yourself with these controls before commencing a full cleaning session to ensure efficient operation and prevent unnecessary solution usage.
Using the Trigger and Nozzle
The trigger controls the release of cleaning solution. Depress and hold it to spray the solution onto the carpet or floor while simultaneously moving the nozzle forward. Releasing the trigger stops the spray but maintains suction for extracting the dirty water. Practice this motion to achieve a consistent and effective clean.
The floor nozzle is designed for various surfaces. For carpets, use a slow, overlapping motion, allowing the machine to extract deeply embedded dirt. When cleaning hard floors, utilize the bare floor attachment (if available) to prevent streaking. Pull the nozzle towards you, releasing the trigger and repeating the action to extract excess moisture. Ensure a smooth, controlled movement for optimal results and to avoid over-saturation.
Adjusting Suction and Spray Settings
Suction control is vital for different surfaces. Higher suction is ideal for carpets to lift more dirt and moisture, while lower suction is preferable for delicate rugs or upholstery to prevent damage. Adjust the suction setting using the designated controls on the machine.
Spray settings allow you to control the amount of cleaning solution dispensed. For heavily soiled areas, a higher spray setting provides deeper cleaning action. For lighter cleaning or maintenance, a lower setting conserves solution and minimizes drying time. Experiment with these settings to find the optimal balance for your specific cleaning needs, always testing in an inconspicuous area first.

Maintenance and Cleaning
Regular maintenance—cleaning tanks and filters—ensures peak performance and extends the lifespan of your Big Green Clean Machine, maintaining its cleaning power.
Cleaning the Clean Water Tank
Maintaining a clean water tank is crucial for preventing mold, mildew, and unpleasant odors, ensuring fresh cleaning solution delivery. After each use, or at least weekly with frequent cleaning, disconnect the tank and empty any remaining water. Rinse thoroughly with warm water, avoiding harsh detergents or abrasive cleaners that could damage the plastic.
Inspect the tank for any buildup or discoloration. For stubborn residue, a mild solution of vinegar and water can be used, followed by a thorough rinsing. Ensure all traces of vinegar are removed before refilling. Allow the tank to air dry completely before reattaching it to the machine; Regularly check the tank for cracks or damage, replacing it if necessary to prevent leaks and maintain optimal performance. A clean tank contributes significantly to the overall hygiene and effectiveness of your Big Green Clean Machine.
Cleaning the Dirty Water Tank
The dirty water tank requires regular cleaning to prevent bacterial growth and maintain optimal suction. After each use, remove the tank and carefully dispose of the collected dirty water. Rinse the tank thoroughly with warm water, removing any visible debris or sediment. For a deeper clean, use a mild household cleaner specifically designed for plastic surfaces.
Pay close attention to the tank’s interior, including the float mechanism, ensuring it moves freely. Stubborn stains or odors can be addressed with a solution of vinegar and water, followed by a comprehensive rinse. Allow the tank to air dry completely before reattaching it to the Big Green Clean Machine. Inspect for cracks or damage; replace if needed. A clean dirty water tank ensures efficient operation and prevents unpleasant smells.
Replacing Filters
Maintaining clean filters is crucial for the Big Green Clean Machine’s performance. Regularly inspect the filters for dirt and debris; replace them as needed, typically every 6-12 months with average use. Refer to your model’s parts diagram to locate the filter(s). Gently remove the old filter, noting its orientation for correct installation of the new one.
Ensure the replacement filter is specifically designed for your Big Green Clean Machine model. Install the new filter securely, ensuring a tight seal to prevent air leakage. A clogged or damaged filter reduces suction power and can strain the motor. Replacing filters restores optimal cleaning efficiency and extends the life of your machine. Always disconnect the machine from power before filter replacement.
Troubleshooting Common Issues
This section addresses frequent problems like power failures, suction loss, and leaks, offering solutions to restore your Big Green Clean Machine’s functionality quickly.
Machine Not Powering On
If your Big Green Clean Machine fails to power on, begin by verifying the power cord is securely plugged into a functioning electrical outlet. Test the outlet with another device to confirm it’s delivering power. Inspect the power cord itself for any visible damage, such as cuts or fraying; a damaged cord presents a safety hazard and requires replacement.
Next, check the machine’s circuit breaker or fuse. Refer to your model’s specific documentation for the location and reset procedure. Ensure the on/off switch is fully engaged. If these steps don’t resolve the issue, there might be an internal electrical problem requiring professional service. Do not attempt to disassemble the machine yourself, as this could void the warranty and pose a risk of electric shock.
Loss of Suction
Experiencing a loss of suction with your Big Green Clean Machine often indicates a blockage or full dirty water tank. Immediately power off the machine and disconnect it from the electrical outlet. First, empty the dirty water tank – a full tank will drastically reduce suction power. Next, inspect the hoses and nozzle for any obstructions, such as hair, debris, or tangled fibers.
Check and replace the filters, as clogged filters significantly impede airflow. Ensure all connections are secure and properly sealed. If the issue persists, examine the vacuum/suction path for blockages. Remember to always disconnect the power before performing any maintenance or inspection. Consistent maintenance prevents suction loss and extends machine life.
Leaking Water
Water leaks from your Big Green Clean Machine can stem from several sources. First, verify both the clean and dirty water tanks are correctly seated and securely latched; improper sealing is a common cause; Inspect the hoses and connections for cracks, damage, or loose fittings – replace any compromised components immediately. Ensure the nozzle attachment is firmly connected.
Overfilling the clean water tank can also lead to leaks, so adhere to the maximum fill line. If leaks persist, examine the tank assemblies themselves for cracks or damage. Always disconnect the machine from power before investigating leaks. Promptly address any leaks to prevent water damage and maintain safe operation.
Parts and Accessories
Genuine Big Green Clean Machine parts, like tank assemblies and nozzles, are crucial for maintaining peak performance and extending the life of your cleaner.
Clean Tank Assembly (Part 2037454)
The Clean Tank Assembly, identified by part number 2037454, is a vital component of the Big Green Clean Machine, responsible for holding the clean water and cleaning solution mixture. This assembly directly impacts the cleaning effectiveness of the machine, ensuring a consistent and properly diluted solution reaches your carpets and floors.
Replacing a damaged or worn-out Clean Tank Assembly is essential for maintaining optimal performance. Cracks, leaks, or blockages within the tank can significantly reduce cleaning power and potentially damage the machine. This assembly features a secure cap to prevent spills during operation and transport. Proper installation, following the machine’s manual, is crucial for a leak-free and efficient cleaning experience. Regularly inspect the tank for any signs of wear and tear.
Nozzle Attachments and Their Uses
The Big Green Clean Machine often includes specialized nozzle attachments designed for diverse cleaning scenarios. A standard floor nozzle excels at broad-area carpet and hard floor cleaning, utilizing suction and spray for deep cleaning. A bare floor attachment, typically softer-bristled, prevents scratching delicate surfaces like tile or wood.
Specialty tools, like crevice tools, allow focused cleaning in tight spaces – along baseboards or between furniture. Upholstery tools, often with a brush, gently clean furniture fabrics. Correct nozzle selection maximizes cleaning efficiency and protects surfaces. Always disconnect the machine before switching nozzles. Refer to the manual for specific attachment recommendations based on your cleaning task and surface type for optimal results.
Hoses and Connections
The Big Green Clean Machine utilizes robust hoses and secure connections to deliver cleaning solution and suction power. Regularly inspect the hose for cracks, kinks, or blockages, as these can significantly reduce performance. Ensure all connections – between the machine, hose, and nozzles – are firmly attached to prevent leaks during operation.
Proper hose management extends its lifespan; avoid sharp bends or pulling on the hose. If a leak occurs at a connection, disconnect, inspect for debris, and re-secure. Replacement hoses are available if damage is irreparable. Always power off and unplug the machine before inspecting or replacing any hose components to ensure safety.
Advanced Cleaning Techniques
Mastering specialized methods, like spot treatment and floor-type adjustments, maximizes the Big Green Clean Machine’s cleaning power for exceptional results.
Cleaning Different Floor Types
The Big Green Clean Machine excels on various surfaces, but adjustments are key. For carpets, utilize the carpet nozzle and appropriate suction settings for deep cleaning. On hard floors – tile, linoleum, or sealed wood – switch to the bare floor attachment to prevent scratching and ensure effective water extraction.
Lower suction is generally recommended for delicate hard floors to avoid potential damage. Always test a small, inconspicuous area first to confirm compatibility and prevent discoloration. Avoid prolonged exposure to excessive moisture on wood floors. For area rugs, assess the rug’s construction and adjust settings accordingly; some delicate rugs may require a gentler approach.
Remember to thoroughly rinse the machine after cleaning different floor types to prevent cross-contamination of cleaning solutions and debris.
Spot Cleaning and Stain Removal
The Big Green Clean Machine is effective for spot cleaning, tackling spills and stains quickly. For best results, address stains immediately. Utilize the hose and specialized nozzle attachments for targeted application of cleaning solution.
Pre-treat stubborn stains with a Bissell-approved stain remover before using the machine. Gently blot the area – avoid rubbing, which can spread the stain. Employ the trigger to dispense cleaning solution and simultaneously extract the soiled liquid. Repeat this process until the stain lifts.
For dried stains, allow the cleaning solution to dwell for a few minutes before extraction. Always rinse the treated area with clean water to remove any residue. Remember to test cleaning solutions in an inconspicuous area first.
Using Cleaning Solutions Effectively
The Big Green Clean Machine performs best with Bissell-formulated cleaning solutions, designed to protect the machine and maximize cleaning power. Always follow dilution instructions carefully; using too much solution can leave residue, while too little may reduce effectiveness.
Pour the appropriate amount of solution into the clean water tank, filling to the indicated line. Avoid using excessive sudsing detergents, as they can damage the internal components. For heavily soiled areas, consider a pre-treatment with a stain remover before using the machine.
Experiment with different Bissell formulas to find the best solution for your specific flooring type and stain challenges. Regularly flush the system with clean water to prevent buildup.